Top Ad 728x90

Monday, October 27, 2025

Honey Mustard Pork Chops

by


If comfort food had a golden glaze, it would be this: tender pork chops seared to perfection and coated in a sticky, tangy-sweet honey mustard sauce. It’s the kind of dish that feels fancy enough for guests but simple enough for a Tuesday night. And once you taste it, you’ll understand why it’s been a go-to in my kitchen for years.

I still remember the first time I made it—rain tapping on the windows, craving something cozy but not too heavy. I had pork chops, but wanted more than just the usual pan-fry. So I whisked together honey, Dijon mustard, garlic, and a splash of vinegar, and spooned it over the chops as they sizzled. The result? Juicy, golden pork with a glaze that clung to every bite. My family didn’t just eat—they devoured.

🧂 Ingredients

IngredientAmount
Pork chops (bone-in or boneless)4 chops, 1½–2 lbs total, 1″ thick
Olive oil or butter2 tbsp
Chicken broth or water½ cup
Dijon mustard3 tbsp
Whole-grain mustard (optional)2 tbsp
Honey¼ cup
Garlic, minced2 cloves
Apple cider vinegar or lemon juice1 tbsp
Paprika½ tsp
Salt½ tsp
Black pepper½ tsp
Fresh parsley (optional garnish)As desired

👩‍🍳 Instructions

1. Prep the Pork Chops

  • Pat chops dry with paper towels.
  • Season both sides with salt, pepper, and paprika.

2. Sear to Perfection

  • Heat oil in a large skillet over medium-high heat.
  • Sear pork chops 3–4 minutes per side until golden brown.
  • Transfer to a plate and set aside.

3. Make the Honey Mustard Sauce

  • In the same skillet, sauté garlic for 30 seconds.
  • Stir in Dijon, whole-grain mustard, honey, broth, and vinegar.
  • Whisk and simmer for 2–3 minutes until slightly thickened.

4. Finish Cooking

  • Return pork chops to the skillet.
  • Spoon sauce over them, reduce heat to medium, and cover.
  • Cook for 6–8 minutes, or until internal temp reaches 145°F (63°C).

5. Serve & Savor

  • Spoon extra sauce over the chops.
  • Garnish with fresh parsley if you like.
  • Pair with your favorite sides and enjoy the sweet-savory magic.

Whenever I make this, my husband is over the moon and always wants seconds!

by


These Low-Carb Cheese Buns are a quick and easy bread alternative, perfect for keto or gluten-free diets. They are primarily made from almond flour and melted cheese, giving them a soft interior and a slightly crisp, savory crust.


Low-Carb Cheese Buns

Ingredients:

IngredientQuantity
Almond flour1 1/2 cups
Baking powder1 tablespoon
Salt1/2 teaspoon
Shredded mozzarella cheese2 cups
Cream cheese2 ounces
Large eggs2
Grated Parmesan cheese1/4 cup

How To Make Low-Carb Cheese Buns:

  1. Step 1: Preheat Oven and Prepare Baking Sheet: Preheat your oven to  and line a baking sheet with parchment paper.
  2. Step 2: Melt Cheese: In a microwave-safe bowl, combine the mozzarella and cream cheese. Microwave on high for 1 minute, stir, then heat for another 30 seconds until completely melted and smooth.
  3. Step 3: Mix Dry Ingredients: In a separate bowl, combine the almond flour, baking powder, and salt.
  4. Step 4: Combine Wet and Dry Ingredients: Add the melted cheese mixture to the dry ingredients and stir until combined. Add the eggs and the grated Parmesan cheese and continue to mix, kneading with your hands if necessary, until a uniform dough forms.
  5. Step 5: Shape Buns: Divide the dough into 6 equal parts and shape each piece into a round bun.
  6. Step 6: Bake: Place the buns on the prepared baking sheet, leaving space between them. Bake for 15-18 minutes, or until they are golden brown and firm to the touch.
  7. Step 7: Cool and Serve: Let the buns cool slightly before serving. They are best enjoyed warm.

✨ The Effortless Trick My Nana Taught Me to Clean Oven Racks

by


The kitchen is the heart of every home — but cleaning the oven racks? That’s the job nobody loves. Over time, grease and burnt-on food turn them into a nightmare to scrub. Luckily, my nana shared a simple cleaning hack that makes them sparkle without any effort!


🧽 What You’ll Need

  • 1 bathtub or large plastic tub

  • Hot water

  • 1 dishwasher tablet


🔹 How to Do It

  1. Remove the racks from your cooled oven.

  2. Place them in the tub and fill with hot water until they’re fully covered.

  3. Drop in the dishwasher tablet — it’s the secret weapon!

  4. Let soak overnight — no scrubbing needed.

  5. Rinse and dry in the morning, and you’ll be amazed how easily the grime wipes away.


💡 Final Tip

This trick uses zero harsh chemicals, no elbow grease, and works like magic. Your oven racks will look brand new — just like my nana’s always did! 💕

The Amazing Benefits of Magnesium: What Happens When You Take It Daily

by


Magnesium is an essential mineral that supports your muscles, nerves, and energy levels. Here’s what you might notice after adding it to your daily routine for a week 👇


🌙 Day 1 – Better Sleep

You may fall asleep more easily as magnesium helps relax the body and mind.

😌 Day 2 – Relaxed Muscles

Muscles and nerves begin to unwind, helping you wake up more refreshed.

💩 Day 3 – Easier Digestion

Magnesium supports healthy digestion and can relieve constipation naturally.

Day 4 – More Energy

Improved rest and better digestion can boost your overall energy and focus.

💪 Day 5 – Fewer Muscle Cramps

Regular magnesium intake helps reduce cramps and muscle tension.

🧠 Day 6 – Sharper Mind

With better sleep and circulation, mental clarity and focus often improve.

🌿 Day 7 – Overall Balance

After a week, many feel calmer, more energized, and in better overall health.


🥗 How to Get More Magnesium Naturally

Add magnesium-rich foods to your meals:

  • Leafy greens (spinach, kale)

  • Nuts and seeds (almonds, pumpkin seeds)

  • Whole grains (brown rice, oats)

  • Legumes (lentils, chickpeas)

  • Fish (salmon, mackerel)

💊 You can also take supplements — but check with your doctor first.

5 Critical Health Signals: Recognizing a Mini-Stroke in Seniors That Shouldn’t Be Ignored

by


Mini-strokes, or Transient Ischemic Attacks (TIA), are short episodes where blood flow to the brain is blocked for a brief time. While symptoms fade quickly, they’re a serious warning sign of a possible major stroke. Recognizing them early can save a life — especially in older adults.


1️⃣ Sudden Weakness or Numbness

If one side of the body suddenly feels weak or numb — in the face, arm, or leg — it could signal a mini-stroke. The person might not lift an arm or their smile may look uneven. 🚨 Act fast — call emergency services immediately.


2️⃣ Slurred or Confused Speech

Trouble speaking or understanding others is another key sign. The person might mix up words, speak unclearly, or struggle to respond. 🗣️


3️⃣ Vision Problems 👀

Blurred or double vision, or sudden loss of sight in one eye, can occur during a mini-stroke.


4️⃣ Dizziness or Loss of Balance 😵‍💫

Feeling suddenly dizzy, disoriented, or unable to stand steadily can indicate blood flow disruption in the brain.


5️⃣ Sudden Severe Headache

A sharp, intense headache with no clear cause — often described as “the worst ever” — should be taken seriously, even if it fades.


❤️ What to Remember

A mini-stroke is your body’s warning alarm. Don’t wait for symptoms to pass — get medical help right away.
Risk factors include high blood pressure, diabetes, smoking, and high cholesterol.

Early detection and treatment can prevent a full-blown stroke and protect long-term brain health. 🧠💪

I eat vegetable stew day and night and I lose weight quickly. Low calorie recipe!

by


Looking for a healthy, vibrant, and comforting dish that’s packed with flavor? This Colorful Vegetable Casserole is the perfect choice! 🥦✨ Bursting with fresh veggies, creamy cheese, and aromatic herbs, it’s a guilt-free meal that satisfies both your eyes and your taste buds.

Whether you serve it as a main dish or a hearty side, this casserole brings a rainbow of nutrients to your plate — all baked to golden perfection! 🌈💚


🛒 Ingredients:

– 1 head of broccoli, divided into florets 🥦
– 1 red pepper, diced 🌶️
– 1 yellow pepper, diced 🌶️
– 1 orange pepper, diced 🌶️
– 1 carrot, grated 🥕
– 1 zucchini, sliced 🥒
– 2.5 dl cherry tomatoes, halved 🍅
– 2 cloves garlic, finely chopped 🧄
– 2.5 dl light cheese (mozzarella or cottage cheese) 🧀
– 2.5 dl low-fat milk 🥛
– 2 eggs 🥚🥚
– Salt and pepper to taste 🧂
– 1 tsp dried basil 🌿
– 1 tsp dried oregano 🌿


👩‍🍳 Directions:

  1. Preheat the oven:
    Heat to 180°C (350°F). 🔥

  2. Prepare the vegetables:
    In a large bowl, combine broccoli, peppers, carrot, zucchini, cherry tomatoes, and garlic. 🌶️🥕🍅

  3. Make the cheese sauce:
    In another bowl, whisk together cheese, milk, eggs, salt, pepper, basil, and oregano until smooth. 🧀🥛🌿

  4. Assemble the casserole:
    – Lightly grease a baking dish with oil or shortening. 🧴
    – Add the vegetables. 🍲
    – Pour the cheese mixture evenly over them. 🧀

  5. Bake:
    Cook for 25–30 minutes until the top is golden and bubbly and the veggies are tender. 🔥

  6. Serve:
    Let it cool for a few minutes before digging in. 🍽️

Enjoy your light, cheesy, and colorful casserole — the perfect blend of comfort and nutrition! 💚🌈

The juice that empties the intestines of toxins and fecal matter: loses 4 kilos in 7 days

by


Colon Detox Juice


Ingredients

    • 1 apple
    • 1 tablespoon flaxseeds
    • 1 tablespoon chia seeds
    • 1 teaspoon of honey
    • 1 glass of water

Preparation

  1. Blend the ingredients :
    • Place the apple, flaxseeds, honey, and water in a blender. Blend until smooth.
  2. Add the chia seeds :
    • Pour the mixture into a cup and add the chia seeds. Stir well and let steep for 5 minutes.

Assumption

  • Consume this drink 2 times a day for 15-20 days .

After reading this tip, you will never throw away old orchids again.

by


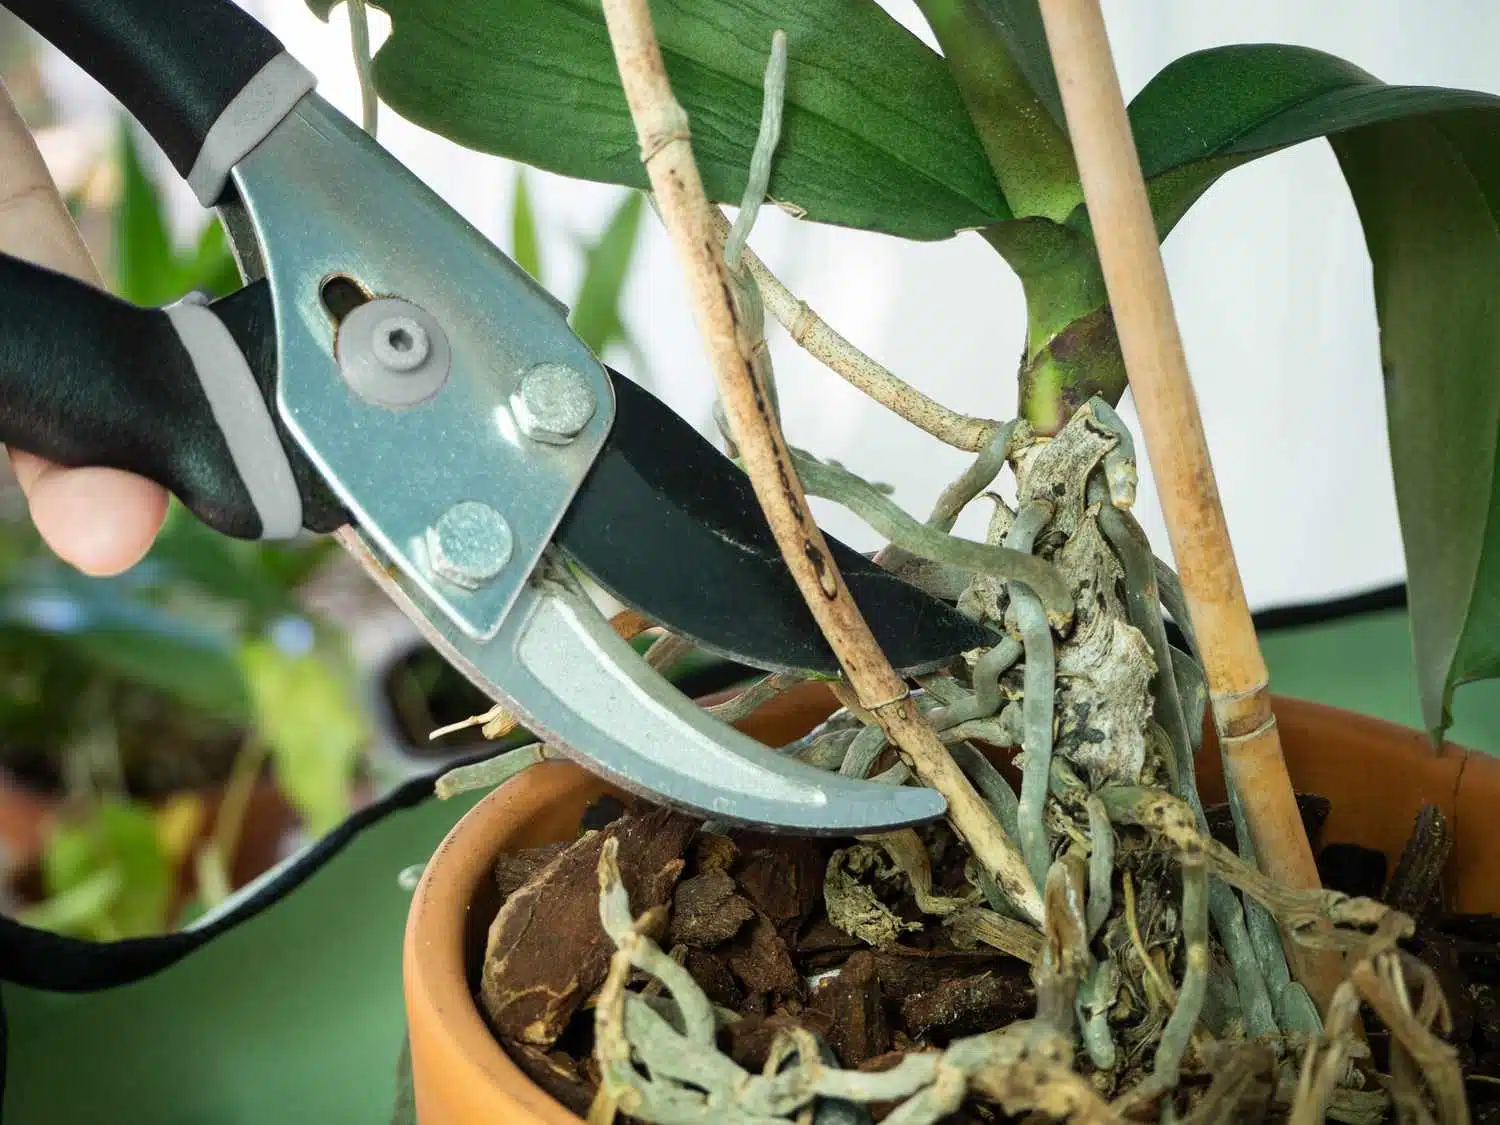
Orchids are often perceived as fragile and capricious. When they appear dried out, many assume it is too late and get rid of them. However, even an orchid that appears to be dying can regain its full splendor with the right care. So, how can you tell a truly lost plant from a dormant orchid? And most importantly, what are the steps to revive it?

Why does your orchid look dead?

Before jumping to conclusions, it is essential to understand why your orchid  is showing signs of weakness . In their natural environment, these exotic plants cling to trees and absorb ambient humidity. Indoors, poor maintenance can disrupt this balance. Too much water, not enough light or an unsuitable substrate can  weaken the plant to the point of making it unrecognizable .  But rest assured, all is not lost!

Signs of an Orchid Still Salvageable

Don’t just rely on wilted leaves! Instead, check:

  • Roots:  If they are green or white and firm, your orchid is alive. If they are brown and soft, they are rotten and should be cut off.
  • The trunk (or pseudobulb):  if it is still firm and not hollow, the plant can be saved.
  • Dormant buds:  sometimes invisible to the naked eye, they can wake up if the environment is favorable.

If your orchid is showing these signs of life, follow these steps to revitalize it!

How to revive a tired orchid?

1.Prune the dead parts

Using disinfected scissors, remove  damaged  or soft roots and dry stems. This will prevent the plant from wasting its energy on irrecoverable parts.

2.Rehydrate the roots

Soak the base of the orchid in warm, non-calcareous water   for 15 to 20 minutes. This will allow the  dried-out roots  to gently rehydrate.

3.Provide him with a suitable environment

Instead of replanting your orchid directly, wrap its roots in  slightly damp sphagnum moss  (a natural moss that retains water). Then place it in a clear container  that allows light to pass through  and maintains sufficient humidity, without excess stagnant water.

4.Provide adequate light for it

Orchids like light, but not direct sunlight which burns their leaves. A location  near an east or west facing window  is ideal.5.Be patient and watch for signs of recovery

Water sparingly and make sure to maintain constant humidity  without overwatering . After a few weeks, you should see new roots or even young leaves appearing!

The satisfaction of seeing an orchid bloom again

Reviving an orchid takes time, but what a satisfaction it is to see the first shoots appear! This experience reminds us that nature is full of surprises and that, even when a plant seems lost, it can be reborn with a little attention. So, before throwing away your orchid,  try these techniques  : you might be pleasantly surprised!

The 7-Day Cucumber Diet That Drops Pounds Very Fast

by


If you’re on the hunt for a quick and natural way to shed those pesky pounds, the 7-Day Cucumber Diet might just be your new best friend. This simple yet effective plan centers around cucumbers—a low-calorie, hydrating vegetable packed with essential nutrients that will help you lose weight while nourishing your body. Let’s explore how this diet works, its benefits, and a delicious 7-day meal plan to kickstart your journey to a healthier you! 🥒✨

Benefits of the Cucumber Diet

  • Quick Weight Loss: By replacing calorie-dense foods with cucumbers, you create a calorie deficit, leading to rapid weight loss.
  • Detoxification: Cucumbers help flush out toxins and reduce water retention, giving your body a natural cleanse.
  • Improved Skin Health: Thanks to their hydrating and antioxidant properties, cucumbers can rejuvenate your skin and give you a healthy glow.
  • Boosted Metabolism: The light yet nutrient-rich meals in this diet keep your metabolism active and efficient.

7-Day Cucumber Diet Plan

Day 1: Fresh Start

  • Breakfast: A smoothie made with 1 cucumber, a handful of spinach, 1 green apple, and water or unsweetened almond milk.
  • Snack: 1 sliced cucumber with a sprinkle of sea salt and a squeeze of lemon.
  • Lunch: Cucumber salad with diced tomatoes, onions, and a drizzle of olive oil and vinegar. Add a boiled egg for protein.
  • Snack: 1 cucumber blended with lemon juice and mint for a refreshing drink.
  • Dinner: Grilled chicken breast served with a side of cucumber slices.

Day 2: Cucumber Power

  • Breakfast: Greek yogurt topped with cucumber slices and a handful of chia seeds.
  • Snack: Cucumber sticks served with hummus.
  • Lunch: Large cucumber salad with shredded carrots, bell peppers, and a light vinaigrette.
  • Snack: 1 cucumber and a handful of raw almonds.
  • Dinner: Steamed fish (like salmon or cod) with roasted zucchini and cucumber slices.

Day 3: Add More Greens

  • Breakfast: A smoothie with 1 cucumber, kale, 1 kiwi, and a splash of coconut water.
  • Snack: Sliced cucumber and celery sticks with guacamole.
  • Lunch: Cucumber and quinoa salad with cherry tomatoes, parsley, and lemon dressing.
  • Snack: 1 cucumber sprinkled with chili powder for a spicy kick.
  • Dinner: Turkey or veggie burger wrapped in lettuce, served with cucumber slices on the side.

Day 4: Stay Hydrated

  • Breakfast: Overnight oats topped with cucumber slices and a few berries.
  • Snack: Cucumber-infused water with lime and basil.
  • Lunch: Grilled chicken or tofu salad featuring cucumbers, avocado, and arugula.
  • Snack: Cucumber and carrot sticks with tzatziki dip.
  • Dinner: Stir-fried vegetables (including cucumbers) with tofu or shrimp.

Day 5: Mid-Week Cleanse

  • Breakfast: Smoothie with 1 cucumber, a handful of spinach, 1 pear, and unsweetened almond milk.
  • Snack: Cucumber slices topped with a dollop of cottage cheese.
  • Lunch: Cucumber, chickpea, and avocado salad with lemon juice and olive oil.
  • Snack: A refreshing cucumber and watermelon salad.
  • Dinner: Grilled chicken served with a side of cucumber and steamed broccoli.

Day 6: Go Light

  • Breakfast: Greek yogurt mixed with cucumber and a drizzle of honey.
  • Snack: 1 cucumber with lemon and black pepper.
  • Lunch: Cucumber soup made with blended cucumbers, Greek yogurt, garlic, and dill.
  • Snack: A smoothie featuring 1 cucumber, pineapple, and coconut water.
  • Dinner: Grilled fish accompanied by cucumber slices and a mixed greens salad.

Day 7: Finish Strong

  • Breakfast: Smoothie with 1 cucumber, a handful of kale, 1 banana, and almond milk.
  • Snack: Sliced cucumber drizzled with tahini.
  • Lunch: Large cucumber salad with boiled eggs, cherry tomatoes, and a light vinaigrette.
  • Snack: Cucumber and celery juice with a squeeze of lemon.
  • Dinner: Grilled chicken or tofu served with a cucumber and avocado salsa.

Tips for Success

  • Stay Hydrated: Drink plenty of water throughout the day to stay hydrated and enhance detoxification.
  • Keep Snacks Handy: Always have cucumbers ready for a quick, guilt-free snack.
  • Customize Portions: Adjust portion sizes based on your activity level and hunger.
  • Combine with Light Exercise: Incorporate walking, yoga, or light cardio to boost results.

Egg Salad Sandwich

by


INGREDIENTS

For the Egg Salad:

  • 6 hard-boiled eggs, peeled and chopped
  • 1/4 cup mayonnaise
  • 1 tsp Dijon mustard
  • 1 tsp lemon juice
  • 1 tbsp chopped chives (plus more for garnish)
  • Salt and pepper to taste
  • For the Sandwich:
  • 4 slices of whole-grain or sourdough bread, toasted
  • Butter or lettuce leaves (optional)


DIRECTIONS

Step 1: In a mixing bowl, combine chopped eggs, mayonnaise, Dijon mustard, lemon juice, and chives. Stir gently until everything is mixed. Season with salt and pepper to taste.

Step 2: Optional: Butter one side of each bread slice for extra richness or line them with lettuce for a crisp bite.

Step 3: Scoop a generous amount of egg salad onto two slices of toasted bread. Top with the remaining bread slices to complete the sandwich.

Step 4: Garnish the sandwich with extra chopped chives for a pop of freshness. Slice in half and serve immediately! 🥪✨

TIME & SERVINGS

  • Prep Time: 10 minutes
  • Cooking Time: 10 minutes (to boil the eggs)
  • Total Time: 20 minutes
  • Calories: ~290 per serving
  • Servings: 2 sandwiches

Top Ad 728x90